Automating infrastructure deployment on Azure using CI-CD pipeline and Terraform
Nowadays, having a well secured cloud infrastructure is vital. Nobody wants any undesirable action to be taken in the production environment. Moreover, everything is moving towards automation of almost all aspects of our functioning – that includes developing software. For this reason, developers build pipelines that deploy changes on specific environments automatically. Automation eliminates manual steps and, therefore, reduces the risk of making a mistake. Modern solutions give us plenty of tools that could validate each step of a specific process in headless scenarios.
During the Cloud Program, one of our goals was to prepare a properly working CI/CD pipeline for infrastructure deployment. We have assumed the Infrastructure as a Code (IaaC) approach and created configuration with a Terraform tool. Based on the article written by Piotr Gwiazda, we have created a pipeline for maintaining infrastructure and now we want to share a real life example of that kind of thing. We believe that after reading this article, you will no longer create or update your infrastructure on specific environments manually using the terraform apply command.
This article is intended to be a form of a guide that you can use to create a pipeline yourself, based on our example.
What are we going to do?
Before looking at the implementation of the solution, it is worth explaining what we want to achieve and how we want to get there. The presented solution has to fulfill the following requirements:
- It should be created from code (IaaC) using Terraform (such an approach guarantees easy customization, extension and transfer of the whole infrastructure),
- It should be deployed on multiple environments (in our case: two, but it is a flexible solution, easy to apply on a larger number of environments if needed),
- Infrastructure creation or update should be a fully automated process, the only human interference should be limited to check and approval phases of the process (this minimizes the risk of errors caused by the human factor),
- It should be secured from any unauthorized actions (this ensures that the infrastructure and its state cannot be accessed or modified in any way other than through the pipeline process).
As mentioned, we are building our solution on Azure Cloud, which provides a service called Azure DevOps. It is an excellent tool for management of Azure infrastructure and services. It offers a wide range of utilities. Among them there are two, which in our case are the most useful, namely:
- repositories – for storing infrastructure code,
- pipelines – for process of building infrastructure.
Another great feature is the ability to integrate DevOps with other Azure services such as Active Directory, which can be used to protect infrastructure by applying RBAC (Role-based access control).
As you can see, Azure provides many readymade solutions dedicated to make the whole process a lot easier and faster to implement. The only non-Azure solution that we are going to use is Terraform. Having the basics explained, let’s move on to the most interesting part – implementation of the solution.
Implementation of the problem – pipeline
Think about a service principal!
A well secured environment requires certain actions. In order to secure cloud infrastructure, you should create a service principal with specific roles and privileges that will be used by the pipeline to maintain the entire infrastructure. In our case, we created the service principal with Owner role in a specific resource group scope. Moreover, it is necessary to grant special privileges for that service principal – Company Administrator and User Account Administrator.
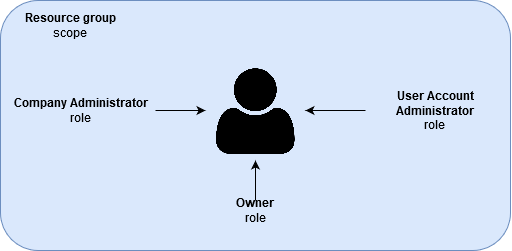
The described scenario ensures that nobody can modify the infrastructure, except the service principal.
How to create a service principal and grant necessary roles to it?
Follow the steps below to create a service principal and grant all necessary roles:
- Create a service principal with Owner role in specific scope.
- Configure a service principal for managing Azure Active Directory (add Company Administrator and User Account Administrator role).
Besides, it is also vital to secure the ability to make changes into main branches (such as develop, master, etc.) on your repository using Terraform code. It should be possible only via pull requests with obligatory approvals done by someone from your team. After that, you could set up a trigger in the pipeline which will react on changes incoming into main branches.
The whole process described in this article is based on two correlated pipelines:
- The pipeline which is creating and publishing an artifact with Terraform code in Azure Pipelines scope,
- The release pipeline which is validating our Terraform code and applying that code on a specific environment.
Pipeline for creating and publishing an artifact
The first step in the entire process is to build the artifact with Terraform code and to publish it. In our case, we have a trigger for the develop branch. If any changes occur on this branch, then the pipeline is started. The image below depicts this process.
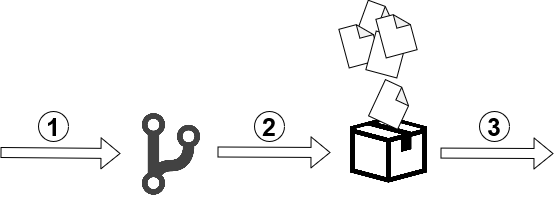
- Changes occur on develop branch,
- Pipeline has just started – copying Terraform files to artifact,
- Publishing that artifact in Azure Pipelines scope.
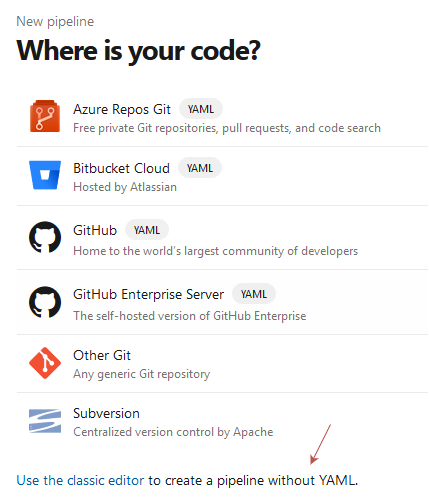
Create pipeline for building and publishing an artifact
In order to create this kind of pipeline, go to Azure DevOps, then click on the Pipelines section and find New pipeline button. We are interested in the classic pipeline, so choose that option.
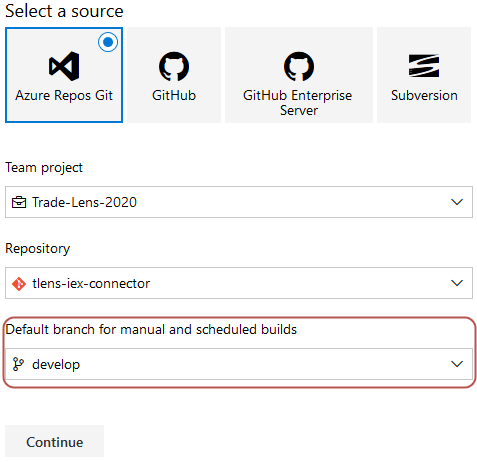
Afterwards, select a source of your repository. In this step, you should also set up a trigger that will launch a pipeline when changes will be merged into chosen branch.
Now, choose Empty job from templates list. Make sure that your pipeline consists of two steps:
- Create an artifact by copying Terraform files into it,
- Publish artifact.
In order to make these steps working, you need to add new tasks by clicking on the (+) button. Choose Copy files and Publish build artifact tasks from the list and click on Add button.
Now we can dive into the configuration of each task. Let’s start from copying Terraform files into the artifact.
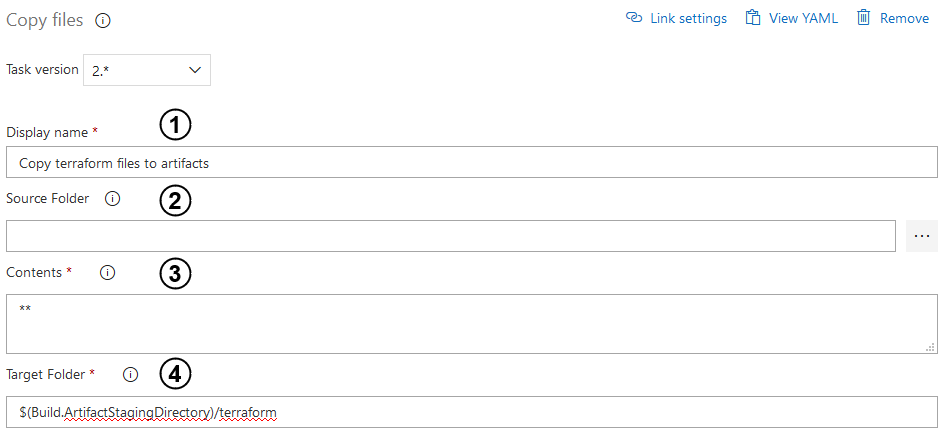
- Enter the input with a name of the task.
- Specify source folder of your Terraform code. Empty field is the root of the repo which you specified when creating the pipeline.
- Indicate file paths to include as a part of the copy. Two asterisks copy all files in the specified source folder and all files in all sub-folders.
- Point out a target folder to which all files will be copied. Use predefined variables to make sure that your Terraform code will be in the correct place.
Subsequently, we can move on to configuring the Publish build artifacts task.
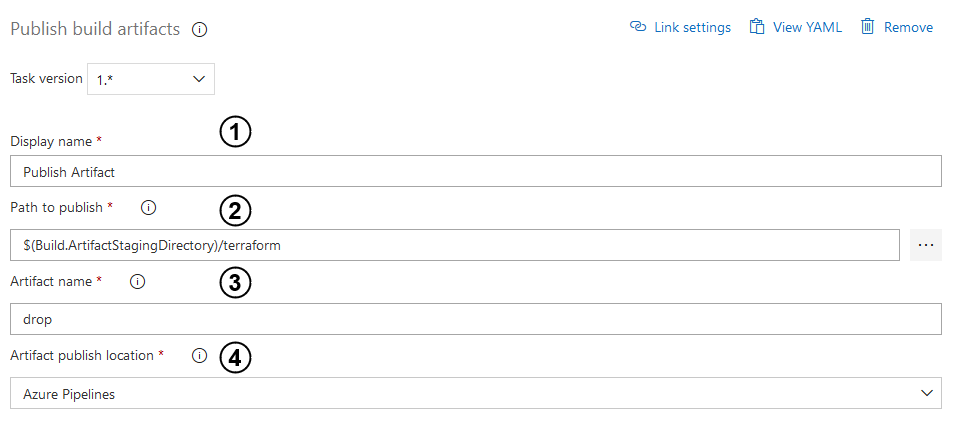
- As before, enter the input with a name of the task.
- Then, indicate a file path to publish. You can use the same path as you have placed in the fourth point of the previous task.
- Enter that input in order to name your published artifact.
- Select a scope in which your artifact will be published.
If you have consistently followed all the above steps, then you have the first pipeline ready.
Preparation steps before creating a release pipeline
Service connections
There are a few requirements before creating a release pipeline for infrastructure. First, you have to create a brand new service connection in Azure DevOps. Click Project settings > Service connections* and then click on New service connection button. Find an Azure Resource Manager connection type and choose the Service principal (manual) authentication method. It is obligatory to enter all inputs with proper data. You can easily find subscription id and subscription name in Portal Azure. Coming to authentication panel, use credentials of your service principal that you have created earlier.
For now it is all about service connection. We will use that later when creating the release pipeline.
Release pipeline for maintaining cloud infrastructure
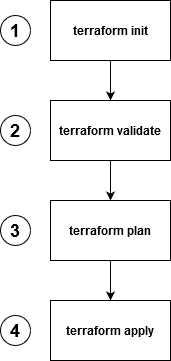
The next step is to take the published artifact and use it to build or modify infrastructure. In order to run the infrastructure written in the form of a Terraform script, the following commands need to be applied:
- terraform init – used to initialize a working directory containing Terraform configuration files [1].
- terraform validate – validates the configuration files in a directory, referring only to the configuration and not accessing any remote services such as remote state, provider APIs, etc [2].
- terraform plan – used to create an execution plan. Terraform performs a refresh, unless explicitly disabled, and then determines what actions are necessary to achieve the desired state specified in the configuration files [3].
- terraform apply – used to apply the changes required to reach the desired state of the configuration, or the predetermined set of actions generated by a terraform plan execution plan [4].
Having described the steps necessary to transform code into working infrastructure, the next phase is to create a pipeline, which will execute Terraform commands, whenever the new artifact will be published.
Let’s dive into the release pipeline
Azure DevOps provides tool directly tailored to satisfy these needs – Release Pipeline.
1. In the DevOps portal, form the menu on the left choose Pipelines > Releases.
2. If there are no pipelines created, there will be a New Pipeline button in the middle, press it, otherwise choose New > New Release Pipeline from the pipeline section, right next to the menu bar.
3. From Select a template menu choose Start with an Empty Job.
In the Pipeline section you can observe that there are two main types of components that are used to build pipelines, namely:
- artifacts – the starting points of pipeline execution. An artifact can either be triggered by a scheduler, or by a source event.
- stages – the units which are responsible for task execution.
It is possible to compose a pipeline using multiple artifacts and stages, yet it has to be stated that artifacts can only be used as initial steps of a pipeline. Stages, however, can be set up with no limitations. They can be stacked in parallel or in a sequence, depending on our needs. Another advantage of stages is that they can be controlled with pre- and post- deployment conditions.
Fig. 9: Release pipeline in edit mode with types of components possible to use.
4. Click Add an artifact. In the pop-up card on the right hand side of the screen, choose Source type Build – as the pipeline will be based on the Build artifact created by the CI pipeline. Point Project to your current project and Source to CI pipeline and click Add.
5. Next, click the Thunderbolt Icon, which should be located in the upper-left corner of the newly created artifact. Enable the Continuous deployment trigger option. Click the Save button located in the upper right hand corner of the portal page.
Following the steps above will result in linking Continuous integration and Continuous deployment pipelines together. Now, whenever the CI pipeline publishes a new artifact, the CD pipeline will be automatically triggered.
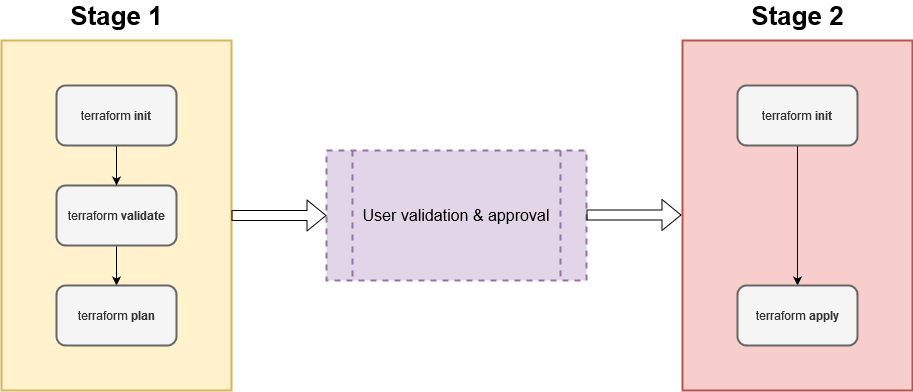
The next step is to create stages, which will process the published artifact. In Figure 8 there is a schema which shows Terraform commands that need to be executed. It is possible to create one big stage, which will process the whole command chain. However, splitting the whole process into more stages will allow to implement checks in-between. Therefore, it is recommended to divide Terraform steps between two phases:
- The first phase, which will validate code and simulate changes that would be done with reference to existing infrastructure. This step will not make any changes to infrastructure.
- The second phase, which will apply changes to infrastructure.
After completing the first step, there will be a safe-check added. This will be the only place in the pipeline where human action is required. In order to run the second phase, user approval is mandatory. That way the developer can make sure that changes to be applied comply with the expectations.
6. Click Add inside stage area and in the the pop-up pane, select Start with an Empty job, then specify the filename. The recommended convention which is descriptive for users is to provide environment name and executed command, for instance: “Environment – Commands”. Sticking to this convention suggested name for the stage would be: “Dev – Plan & Validate”.
7. By default, a newly created stage will be linked to the artifact, which in this case is the desired behavior. If there is a need to change the order of the stage (for example link it to another stage or define pre-deployment conditions), click on the Thunderbolt Icon on the right hand side of stage block. There will appear a pop-up pane on the right hand side of the screen, where it is possible to change settings.
8. Clicking on the 1 job, 0 task inscription under stage name will open the Tasks tab, where the stage’s internal details are located. This tab is used to determine what commands are to be run within the stage. Clicking on the agent job will open agent settings, such as agent OS.
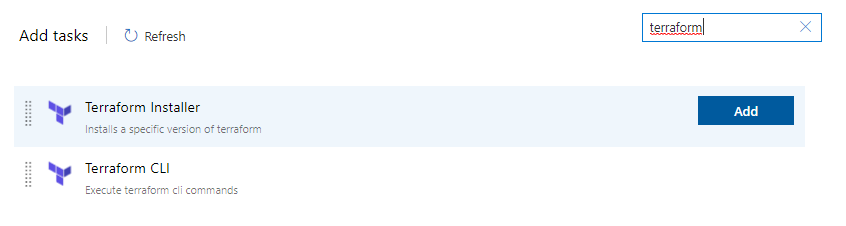
9. Click on the Plus icon to add a task to the stage. In the search box, type “terraform” . There are two Terraform blocks, which will be used:
- Terraform Installer – a block that installs Terraform on agent machine and allows to run Terraform commands,
- Terraform CLI – a block which executes a Terraform command.
10. Add Terraform Installer. It might be possible that blocks will require to be installed prior to using. In such case, follow instructions provided by Microsoft. Clicking on the added block will open block settings. In the case of Terraform Installer block, it is possible to change the Terraform version, the best idea is to use the same version as used for Terraform script development.
11. Add Terraform CLI block three times and configure it according to the figures: 12, 13, 14. First configure the init command block.
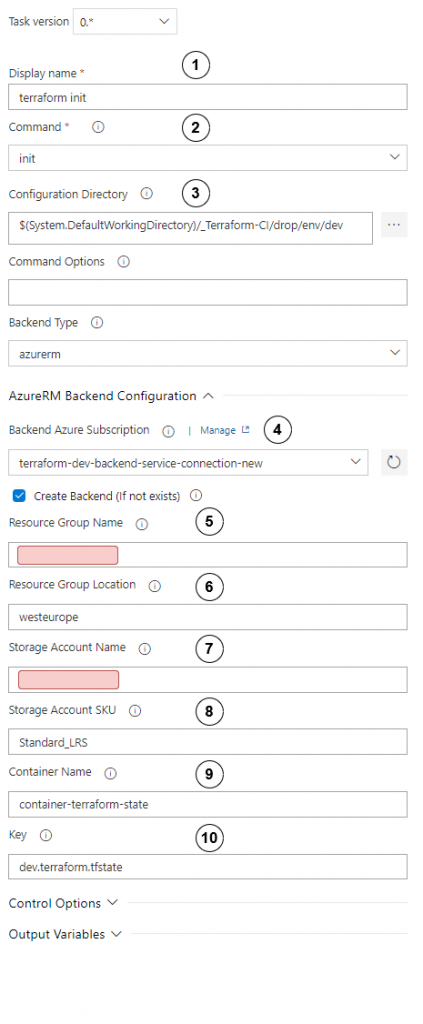
Configure init step as follows:
- Set display name to “terraform init”
- Choose init
- In configuration directory, set path to directory where the main terraform script module is kept.
- Choose service connection to the correct environment and check Create Backend Remember to choose the service connection that you have created in the preparation step!
- Set resource group where terraform state should be kept.
- Set appropriate region.
- Set storage account where terraform state should be kept.
- Choose storage account SKU.
- Set name of container where terraform state should be kept.
- Set terraform state key name.
Next, configure the validate block.
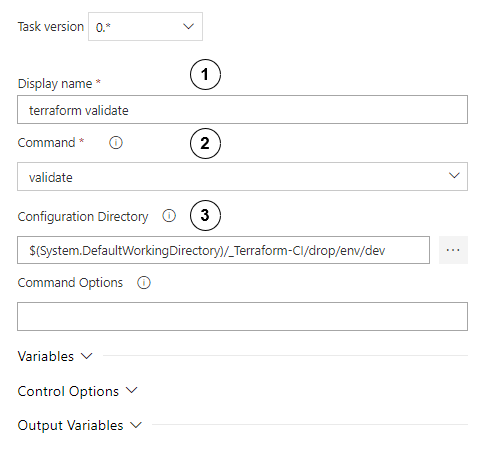
Configure the validate step as follows:
- Set display name to “terraform validate”.
- Choose validate
- In configuration directory, set path to directory where the main terraform script module is kept.
Finally, move on to the plan step configuration.
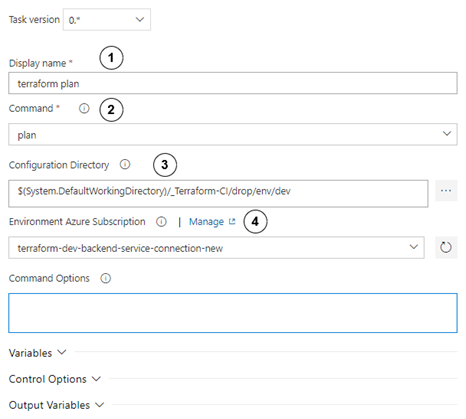
Configure the plan step as follows:
- Set display name to “terraform plan”.
- Choose the plan
- In the configuration directory, set path to directory where the main terraform script module is kept.
- Choose service connection to the correct environment. As before, remember to choose the service connection that you have created in the preparation step!
Having created the stage for validation and plan execution, the next step is to prepare the stage for applying infrastructure.
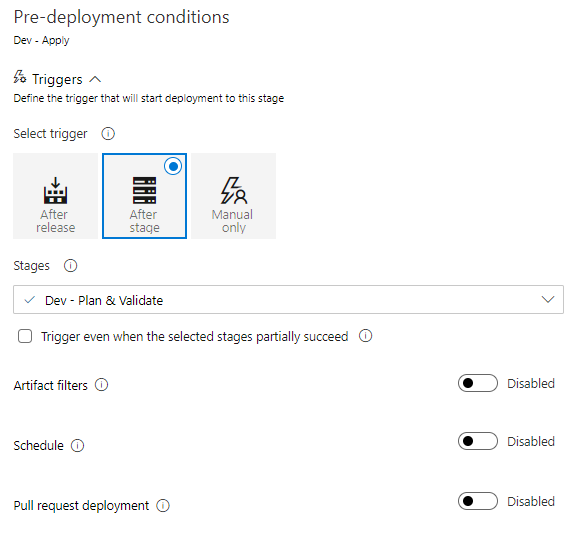
12. Creating the stage for applying infrastructure changes is similar to creating the previous stage. Click Add inside the stage area and in the pop-up pane, select Start with an Empty job and set stage name as: “Dev – Apply”.
13. The newly created stage should be linked to the previous stage automatically. Click on the Thunderbolt Icon on the right hand side of stage block. If the stage was linked properly, the Triggers section should look like in Figure 17. If it is not the case, set triggers according to the configuration presented in Figure 17.
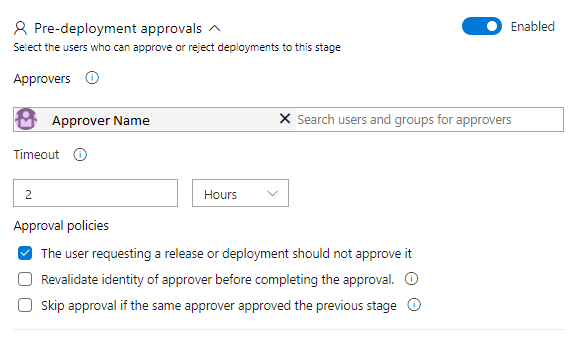
In the Pre-deployment approvals section it is possible to set conditions which need to be satisfied to run the stage. In most cases, the level of security will strongly depend on commands to be executed, as well as environment type. However, it is a good practice to ask for approval of at least one person from the team if the stage is going to make any changes to the existing infrastructure. The basic approval configuration is shown in Figure 18. It’s worth noticing that, when the Pre-deployment approvals section is enabled, all required approvers will be informed by email if there is an approval waiting.
14. Reproduce steps 8 – 10. This configuration is basically the same.
15. Add Terraform CLI block two times.
16. Configure first Terraform CLI block the same way as in Figure 12.
17. The second block will execute Terraform Apply command. Its configuration is presented in Figure 19.
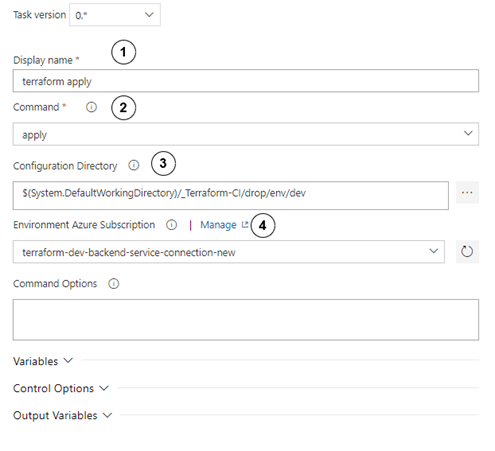
Configure the init step as follows:
- Set display name to “terraform apply”.
- Choose the apply
- In the configuration directory, set path to the directory where the main terraform script module is kept.
- Choose service connection to the correct environment. As before, choose the correct connection service that you have created in the preparation step!
18. Click Save in the upper right area of the screen.
The one-environment, multi-stage Terraform deployment pipeline has been created. Now, whenever the pull-request to the specified branch is completed, the build process will be triggered. If approved, the pipeline will proceed with implementation of changes to the environment.
The last thing to do is to extend the pipeline to support multiple environments. After going through all of the configuration steps for one environment, it will be very easy to reproduce these stages for other environments. A great feature of Release Pipelines is the ability to clone stages, which significantly reduces time of development.
19. Click the Clone button below stage block.
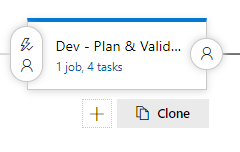
The block will be duplicated. Click on the newly created block and change environment name according to needs. Duplicate both: Plan & Validate and Apply blocks.
20. Go through all of the tasks in the duplicated jobs and make changes to link them to aseparate environment. All of the necessary configuration is shown in Figures 12, 13, 14, 19. The most important changes that should not be omitted:
- change of path to terraform main module script,
- link to different variable group,
- change of azurerm backend configuration,
- change of service connection.
21. The final step is to relate all stages in the desired order. It will be a project-dependent task, yet what has to be taken into account is that higher environments should be protected more and, therefore, changes to them should be deployed as last. Figure 21 shows an example of a setup for two environments.
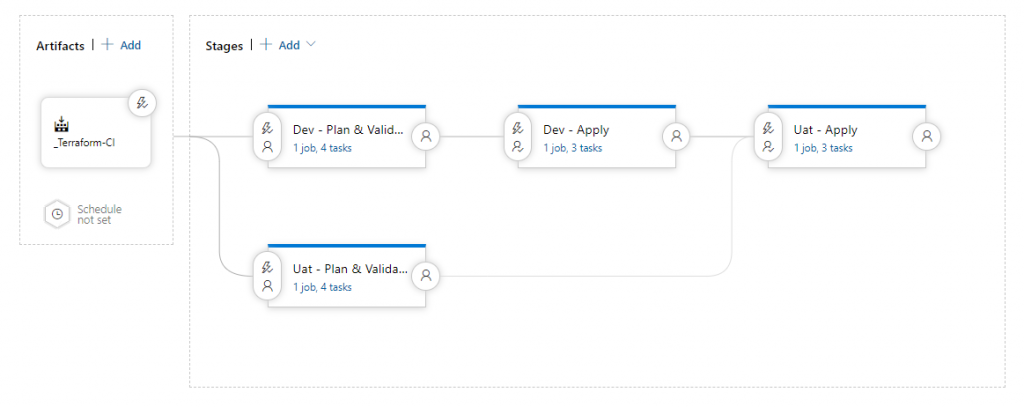
In the example presented in Figure 21, Plan & Validate stages for both environments are executed simultaneously and independently of each other. This is because these steps do not implement any changes in environments. Next, the change has to be applied on the lower environment. Only after that, changes can be introduced to a higher environment. It is worth mentioning that between apply steps (in this case Dev – Apply and Uat – Apply) additional conditions can and should be applied.
22. Open Pre-deployment conditions on Uat – Apply and add at least one approver as in Figure 18. In this case, it should be a more experienced team member such as a technical leader.
23. Open Post-deployment conditions on Dev – Apply (User icon on the right hand edge of the block). Open the Gates section. Here you can set the delay before the start of the next stage. It is a good practice to set at least one day period after modifying infrastructure, in order to ensure that all changes are tested and are working properly. This step provides good protection against rushed, last-minute changes. Enable the Gates section and set delay to 24 hours.

That was the final step of the pipeline building tutorial. Let’s sum it up!
Summary
Nowadays, people try to automate almost all aspects of their daily work. Properly designed automatic processes eliminate the risk of mistakes made due to the human factor. Moreover, they can also save time. There is also a security benefit in the described scenario – there is no possibility to make any changes in infrastructure by an unauthorized person. Every action will be performed by the pipeline. The whole responsibility lies on the person who approves incoming changes by checking out plan results.
In a world full of digital threats, we highly recommend this approach. Today, well secured software should be priority.